SunshineCTF 2025: Remotely Interesting — Forensics Walkthrough
Memory forensics on a Desktop Window Manager (dwm.exe) dump to reconstruct what a victim saw during a suspected RDP compromise.
🎯 Challenge Overview
This writeup covers the forensic challenge Remotely Interesting. The scenario is that an attacker accessed a Windows workstation over RDP, displayed a suspicious window, and the endpoint detection and response (EDR) system captured a memory dump of the Desktop Window Manager process (dwm.exe). The question: what did the victim actually see on screen?
Instead of giving us a screenshot, the challenge gave us raw process memory. The solution required reconstructing on-screen pixel buffers directly from that dump.
Challenge Information
| Property | Value |
|---|---|
| Name | Remotely Interesting |
| Category | Forensics |
| Points | 490 |
| Author | tsuto |
| Difficulty (subjective) | Medium–Hard |
| Story | Scientist accessed via RDP, attacker shows a "strange window", account gets locked out, EDR dumps dwm.exe |
| Goal | Recover what was visible on screen and extract the flag |
Objective
Reconstruct the visible desktop content from the provided
dwm.exememory dump and identify the flag shown in the attacker's window.
🧠 Why Dumping dwm.exe Matters
On modern Windows, all visible windows are first rendered to off-screen surfaces, and then the Desktop Window Manager (dwm.exe) composites those surfaces into the final desktop image. That includes RDP sessions.
That means: if you capture memory from dwm.exe at the right moment, you very often capture pixel buffers that represent what was on screen — pop-ups, dialogs, terminal output, ransomware messages, etc.
This challenge gave exactly that: a raw memory dump of dwm.exe at the instant the attacker’s window appeared. We were asked to reverse-engineer a screenshot out of it. So this is not exploit dev. This is incident response: “show me what the user saw.”
🔍 Approach
At a high level, the workflow is:
- Load the raw dump as bytes.
- Identify regions in memory that look like rendered pixel buffers.
- Rebuild those bytes into images by guessing layout parameters (width, stride, channel order, flip).
- Export all candidates and visually inspect them to find a clean frame containing the attacker’s pop-up (and the flag).
This is less about reversing the malware and more about recreating human-visible evidence from volatile memory.
1. Reading the Dump
First, the script loads the dump and sets up an output directory for generated images. The important part is that we treat the dump file as an opaque byte array — we’re not parsing PE headers, we’re not walking page tables, we’re just going to carve.
#!/usr/bin/env python3
import argparse, os
from PIL import Image, ImageFilter, ImageEnhance

def ensure(p):
    os.makedirs(p, exist_ok=True)

def read(p):
    return open(p, 'rb').read()

ap = argparse.ArgumentParser(description="Fine-tune 1280 width to eliminate banding")
ap.add_argument("dump", help="Path to DWM memory dump")
ap.add_argument("-o", "--outdir", default="recon_fine_tune", help="Output directory")
ap.add_argument("--variants", type=int, default=40, help="Maximum images to generate")

args = ap.parse_args()

ensure(args.outdir)
data = read(args.dump)
print(f"[+] Loaded {len(data):,} bytes")
At this point, data holds the full binary contents of the dwm.exe memory snapshot.
2. Dealing With Raw Pixel Buffers
The memory dump does not contain a ready-made PNG or BMP. There is no metadata telling you the resolution, color channel order, stride, or orientation. Instead, you get raw surface memory — essentially chunks of 32-bit-per-pixel data.
Most Windows desktop surfaces at this layer are 4 bytes per pixel, but those 4 bytes might be in BGRA order, ARGB order, or BGRX (BGR + padding). On top of that, each row of pixels may be padded to an alignment boundary. That padding per line is known as the stride.
If you assume the wrong width, the wrong stride, or the wrong channel ordering, you’ll get corrupted output (banding, color shifts, diagonal tearing, etc.). The script addresses this with two helpers: calculate_stride and to_img_with_stride.
Stride calculation
Many framebuffers don’t store rows as width * 4 bytes exactly. They pad each row up to a boundary like 8, 16, 32, or 64 bytes. The script calculates that stride for a given guessed width and alignment:
def calculate_stride(width, alignment=4):
    """Calculate stride with proper alignment."""
    bytes_per_pixel = 4
    bytes_per_row = width * bytes_per_pixel
    # Align to the specified boundary
    stride = ((bytes_per_row + alignment - 1) // alignment) * alignment
    return stride
For example, if the display buffer is 1280 pixels wide, and alignment is 16 bytes, the stride might be slightly larger than 1280 * 4 bytes because of padding at the end of each row.
Re-mapping raw bytes to RGBA
Once we have guesses for width, height, stride, and pixel format, we try to rebuild an actual PIL.Image. The script walks line by line, copies each row from the dump into an RGBA buffer, and reorders channels accordingly.
def to_img_with_stride(bytes_bgra, w, h, mode, stride=None):
    """Convert raw bytes to PIL Image with explicit stride handling."""
    if stride is None:
        stride = w * 4

    expected_size = w * h * 4
    rgba = bytearray(expected_size)

    try:
        for y in range(h):
            src_offset = y * stride
            dst_offset = y * w * 4

            if src_offset + w * 4 > len(bytes_bgra):
                break

            row_data = bytes_bgra[src_offset:src_offset + (w * 4)]

            for x in range(w):
                if mode == "BGRA":
                    # bytes: B G R A -> RGBA
                    rgba[dst_offset + x*4 + 0] = row_data[x*4 + 2]  # R
                    rgba[dst_offset + x*4 + 1] = row_data[x*4 + 1]  # G
                    rgba[dst_offset + x*4 + 2] = row_data[x*4 + 0]  # B
                    rgba[dst_offset + x*4 + 3] = row_data[x*4 + 3]  # A

                elif mode == "ARGB":
                    # bytes: A R G B -> RGBA
                    rgba[dst_offset + x*4 + 0] = row_data[x*4 + 1]  # R
                    rgba[dst_offset + x*4 + 1] = row_data[x*4 + 2]  # G
                    rgba[dst_offset + x*4 + 2] = row_data[x*4 + 3]  # B
                    rgba[dst_offset + x*4 + 3] = row_data[x*4 + 0]  # A

                elif mode == "RGB32":
                    # bytes: B G R X -> RGBA (force alpha 255)
                    rgba[dst_offset + x*4 + 0] = row_data[x*4 + 2]  # R
                    rgba[dst_offset + x*4 + 1] = row_data[x*4 + 1]  # G
                    rgba[dst_offset + x*4 + 2] = row_data[x*4 + 0]  # B
                    rgba[dst_offset + x*4 + 3] = 255                # A

                else:
                    raise ValueError("unsupported pixel mode")

        im = Image.frombytes("RGBA", (w, h), bytes(rgba))
        return im

    except Exception:
        return None
Important details:
- We support
"BGRA","ARGB", and"RGB32". These are common layouts in Windows compositing pipelines. - We don’t assume tight packing. We respect the stride (row length in bytes, which may include padding).
- We convert everything into a canonical RGBA buffer so Pillow can render it.
If the guess is correct, the output is a clean Windows desktop frame. If it’s wrong, you get garbage.
3. Brute-Forcing Reasonable Display Parameters
We still need to guess the actual display dimensions and how they were stored. In remote desktop and CTF workstation setups, it’s very common to see “nice round” working areas like 1024x768 or 1280x768, not massive ultrawide resolutions.
The script includes a routine that sweeps through a set of likely parameters and exports candidate screenshots. This is how we converge on the real image.
def fine_tune_1280(data, outdir, max_variants=40):
    saved = 0

    test_widths    = [1024, 1280, 1281, 1282, 1276, 1284, 1272, 1288, 1264, 1296]
    test_heights   = [768]
    alignments     = [4, 8, 16, 32, 64]

    for width in test_widths:
        for alignment in alignments:
            stride_guess = calculate_stride(width, alignment)

            for use_stride in [stride_guess, width * 4]:
                for height in test_heights:
                    # try several offsets inside the dump
                    for offset in [0, use_stride // 2, use_stride]:
                        # slice a candidate region of memory
                        chunk = data[offset : offset + (use_stride * height)]

                        for fmt in ["BGRA", "ARGB", "RGB32"]:
                            for flip in [False, True]:
                                im = to_img_with_stride(
                                    chunk, width, height, fmt, stride=use_stride
                                )
                                if im is None:
                                    continue

                                # optional cleanup pass:
                                # 1) vertical flip (framebuffers are sometimes upside-down)
                                # 2) slight contrast/sharpness boost for readability
                                im2 = im.transpose(Image.FLIP_TOP_BOTTOM) if flip else im
                                im2 = ImageEnhance.Contrast(im2).enhance(1.3)
                                im2 = ImageEnhance.Sharpness(im2).enhance(1.2)

                                # Build a filename that encodes the parameters we used
                                filename = (
                                    f"w{width}_h{height}_stride{use_stride}_"
                                    f"align{alignment}_{fmt}_{'flip' if flip else 'norm'}.png"
                                )
                                filepath = os.path.join(outdir, filename)

                                im2.save(filepath, "PNG", optimize=True)

                                print(f"  [+] {filename}")
                                saved += 1

                                if saved >= max_variants:
                                    return saved

    return saved
What this is doing:
- It guesses several plausible widths around 1280 (1280, 1281, 1276, etc.) and a common RDP-ish height (768).
- It guesses different alignment boundaries (4, 8, 16, 32, 64), and for each it computes a stride. This handles row padding.
- It tests both the calculated stride and a naive stride (
width * 4) to be safe. - It doesn’t assume the surface starts at the first byte of the dump. It tries small offsets into the dump.
- For each candidate, it tries multiple pixel formats (
BGRA,ARGB,RGB32) and both flipped and non-flipped orientations. - It exports each decoded guess as its own PNG.
This produces a small batch of candidate screenshots that we can review manually. The filename of each exported PNG encodes all parameters (width, height, stride, alignment, pixel format, flip), which is useful for reproducibility in a forensics context.
4. Export and Review
After generating a set of candidate images, the script gives simple guidance on how to spot the correct one:
print(f"\n[+] Generated {saved} images in {args.outdir}/")
print("\n[!] Look for the image with:")
print("    - NO horizontal lines at all")
print("    - Clear text in the window")
print("    - Proper taskbar at bottom")
print("\n[!] The filename tells you the exact parameters:")
print("    - nopad = no stride padding")
print("    - stride#### = stride value used")
print("    - align## = alignment boundary")
print("\n[!] The CTF flag should be visible in the clear image!")
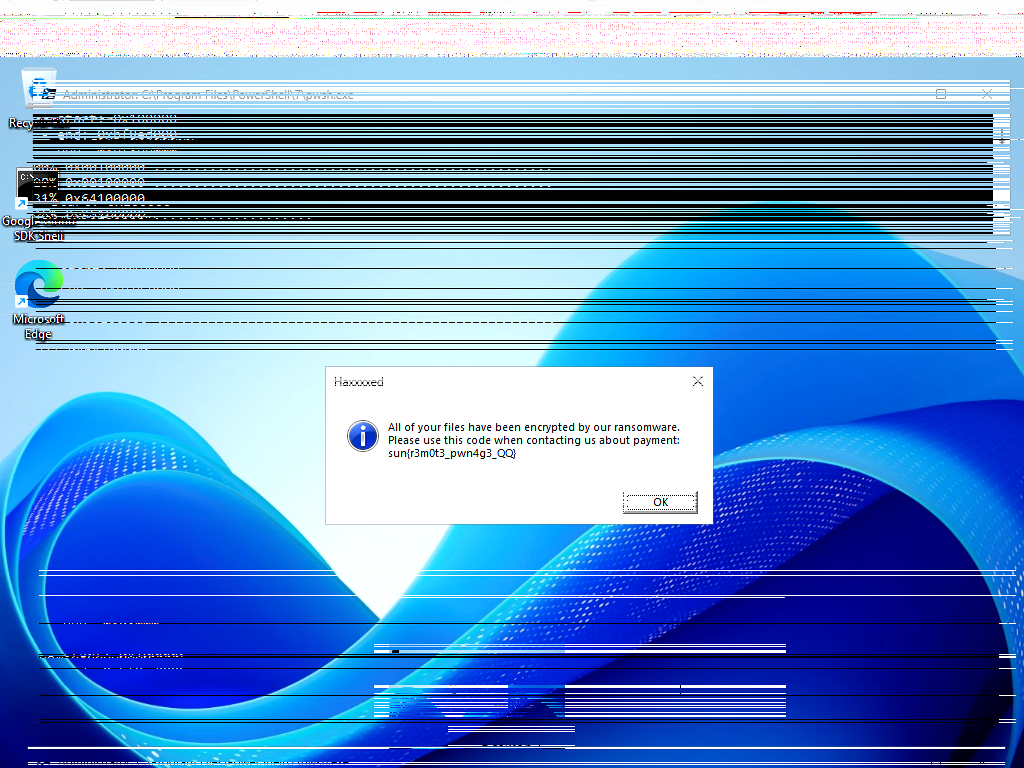
At this point the analysis becomes visual: open the generated PNGs and inspect them. One of them is clearly “the desktop.” You can see the Windows environment, the taskbar, and most importantly the suspicious pop-up window that appeared during the attacker’s RDP session. The flag is displayed inside that window in plain text.
That clean render is the final answer to the challenge.
🖼 Result
The reconstruction produced an actual frame of what the victim saw right before being locked out. You can see a Windows desktop session and the attacker’s injected / malicious dialog. The flag is visibly rendered in that dialog.
This solves the challenge without needing to reverse the malware, without needing persistence on the host, and without needing credentials. We extracted the answer directly from compositor memory.
📚 Lessons Learned
Memory forensics can give you “screenshots,” not just process state
People often treat memory dumps as something you feed into Volatility to get handles, call stacks, injected code, etc. That’s useful, but here we treated memory as a visual artifact. The dwm.exe snapshot contained raw pixel buffers for the active windows. In other words, it contained evidence of what was on the user’s screen.
In real incident response, this is extremely valuable. If a phishing prompt, fake MFA window, or malicious RDP prompt flashed for one second and disappeared, you may not have logs of it. But the pixel data may persist briefly in memory.
Stride, alignment, and channel ordering matter
You cannot assume:
- Rows are tightly packed (
width * 4). - Pixels are stored in nice RGBA order.
- The buffer starts at offset 0 of the dump.
- The framebuffer is “right-side up.”
If you get any of those wrong, your output looks corrupted and you might think the data is useless. The script handles this by brute-forcing combinations: different widths, different stride alignments (4, 8, 16, 32, 64), different pixel formats (BGRA, ARGB, RGB32), upside-down vs upright, and different byte offsets into the dump.
This generalizes well: you can reuse this method on future memory dumps with minimal changes.
Automate and label everything
The script doesn’t try to guess “the one true” configuration. It systematically sweeps a small, realistic search space and exports all results. Every output filename encodes the parameters used to generate that image (resolution, stride, pixel format, flip). This is important for repeatability.
That kind of labeling is exactly what you want if you ever have to justify this in a report: you can point to the known-good image and explain exactly how it was reconstructed, step by step.
This is incident response thinking, not just CTF trickery
The question being answered here is: “What did my user just see?” That is something real teams ask during IR. You may not have keylogging. You may not have full-disk images. But if the EDR grabbed a memory dump of a compositor or GUI subsystem at the right time, you can potentially reconstruct a screenshot after the fact.
🛠 Tools Used
| Tool / Library | Purpose |
|---|---|
| Python 3 | Orchestration and brute-force reconstruction logic |
| Pillow (PIL) | Rebuilding raw RGBA buffers into images, flipping, sharpening, contrast |
| Custom stride logic | Handling per-row padding based on guessed alignment boundaries |
| Custom pixel mapper | Translating BGRA / ARGB / RGB32 into canonical RGBA (to_img_with_stride) |
| Manual inspection | Final human validation to identify the correct desktop frame and read the flag |
📌 Conclusion
This challenge is a practical demonstration of applied forensics and response:
- We were not given filesystem access.
- We did not escalate privileges or dump credentials.
- We did not need to reverse the attacker’s tooling.
- We were given one volatile artifact (the
dwm.exememory dump) and asked a human question: “What did my user just see on screen?”
By treating the Desktop Window Manager dump as a source of live composited pixel buffers and reconstructing those buffers while accounting for stride, pixel format, and orientation, we were able to recreate a faithful view of the victim’s desktop and extract the flag.
This is exactly the kind of workflow you want during an actual security incident: fast, explainable, and focused on answering operational questions.
Author: k33w3
Team: MaaSec
Role: CTF team
Focus areas: Cloud security, incident response, secure infrastructure